Blog Updates

Attention Blog Readers

Content coming every day, come back again to see what's new

Ma'iingan

Sunday, February 21, 2021

DIY Hard Happy Planner Cover

I noticed a serious lack in tutorials in making a hard Happy Planner, or ring disc planner covers, so Ill make my own.

I've searched and searched for ideas on how to make them, but turned up empty. Any diy covers were for laminated covers, and, frankly, I find them too flimsy for my liking. Sure you can make a variety of pretty covers, but I just wanted a classic black cover that didn't buckle or fold as I picked it up.

So, here is my tutorial. You will need:
-Hardcover sketchbook, chipboard, or stiff cardboard
-Crop-o-dile or other heavy duty hole punch
-Box cutter


Take apart your sketch book (or if you have Chipboard, ignore this step)

Using your crop-o-dile/hole punch, start with the second hole from either the top or bottom, and going to every second hole, make the holes bigger. Then, using your box cutter, cut notches in card where the widened holes are to accommodate the rings.

Carefully push the cover onto the rings, and there you go. A 5-minute hard planner cover.
I used a hardcover wire bound sketchbook from my local dollar store to make this one. It can also allow for you to use the paper and not have to buy extra.

Tuesday, October 13, 2020

Witchy Potion Bottles (pt. 1?)

'Tis that time of year again when the air feels magical and Samhain comes upon us (or Halloween for the non-Witchy folk lol).

When I was a child I used to obsess with all things potions. My mom used to bring home small travel-sized bottles of shampoos, conditioners and lotions from the hotel she worked at, and I'd ask if I could have them to play "potions". I'd take these little bottles, empty them of their original contents and fill them with all kinds of colored waters, then pretend to mix them into my own personal potions. Naturally there wasn't much I could do with them besides mix colors, but it gave me a magical feel nonetheless. 

The fur in this one is fur from my dog lol

Even today I obsess over potion bottles. I ***LOVE*** with a fiery passion bottles of all kinds, from the tiniest corked bottles, to large decanters and decorative liquid bottles. It takes all I have to not bring home every bottle I find, though there are times when I let myself go and buy pretty bottles with crafty ideas in mind. 

Now that I'm older with my own money, and have my own little "Witchy Cottage" in which I can decorate to my hearts content with whatever **I** want, the time has come to make more realistic Witchy potion bottles. I have a plan to make both fantasy and practical Witch bottles in which to decorate my space. 

I've been on the prowl on both Pinterest and YouTube looking for inspiration for my "potion bottle" makings, and have found some great ideas. 


For this one, I am making dragon scales. Pine cone "teeth" painted with iridescent nail polish. Who knew?!?? So far I've only painted two pine cone "teeth", just to see how it comes out, and it looks amazing. I have other "dragon" themed ideas for other bottles, such as dragon teeth and claws. Both I plan on using clay to form (maybe a tutorial later on?), and may require larger bottles to fit (which is perfectly fine for me lol).


Next, was "cat whiskers". Someone came up with the idea of using fishing line cut to roughly the size of cat whiskers and place them in a bottle. Because I figure that most whiskers are black (or at least they are on the dogs I've had), I used black upholstery thread (it's fairly thick string) and placed it in a small bottle. Super, super easy. No skill involved (unless you decorate the bottle, but that will come later).

These are but a couple of inspired ideas for mere "fantasy" bottles used for decorating my little home 20ft away from home (lol). I have a few other jars that contain practical ingredients for my practical practices. They contain herbs I've gathered throughout the course of my practice. But, after looking at all the ideas for fantasy bottles, I've come up with the idea of using "witchy codes" for my herbs...like "graveyard dirt" for my mullein, "bloodwort" for yarrow and "beggars buttons" for burdock. Naturally I'll add the common names for them somewhere on the bottles (probably the bottom) just so I don't confuse myself lol. 

I just love these ideas. The more I can create a witchy atmosphere in my cottage, I assume the better I can be at my practices. Hopefully you will have the same effect. Blessed Samhain


Links of interest

Apothecary Bottles (YouTube)

Halloween Apothecary Jars (Pinterest)

Saturday, October 10, 2020

DIY Altar Tile

In a perfect world, every witch would have a solid silver or pewter altar tile in which to place the items they want to bless during rituals, but sometimes that's not feesible. For one thing, I cannot find a tile I like, nor do I have the money to buy some of the ones I've seen on sites like Amazon, or even Etsy. So I decided to make my own, and you can too. There are a variety of ways you can do this, but I'm rather impressed with this one, so this is the one I'll show you.

What you will need to make your own Altar Tile:

-Wooden disk

-Pencil and another marking device

-Carbon paper

-Design you want to copy onto your disk (Optional. Be aware many images are copyrighted so use them for your own personal use).

For my altar tile I found good sized round wooden disks at my local dollar store (why go broke for things you can use in your craft? You don't always need a metaphysical store for everything, making them infuses your energies with them, so get crafty 😊😊).


I then found a pentacle image I really liked and printed it off (this is COMPLETELY optional. You can simply draw a pentacle if you like). I cut it out as best I could, then laid down some carbon paper on top of my disk, centered the image on the disk as best I could and traced the pentacle using my pencil. 

After I was happy with the design, I then traced over the carbon image with a brown marker, to give it a look of wood-burning. I was really, really impressed with how it turned out. If you're interested in doing the same, Pinterest has lots of different types of pentacles you can copy (see disclaimer above).

I think I'm going to go over it in Mod Podge to protect it from any damage, then place it on my altar for future use. There are lots of variations to this. If you can find a wooden plate, you can use that (I did in the past), or you can use a glass candle plate. Really anything round will work (or square if you like). This is your tool, create it as you like, and use it with pride 😊


Friday, October 9, 2020

Trinket Shelf

Trinket shelves can be useful for people in all walks of life, not just us Witches and Pagans. They can be used to hold mementos, private items one doesn't want to hide somewhere and forget, or to display treasured items. 

I've seen plenty of Pagans creating various boxes in a variety of mystical designs, but I didn't want just another box to throw stuff in haphazardly. 

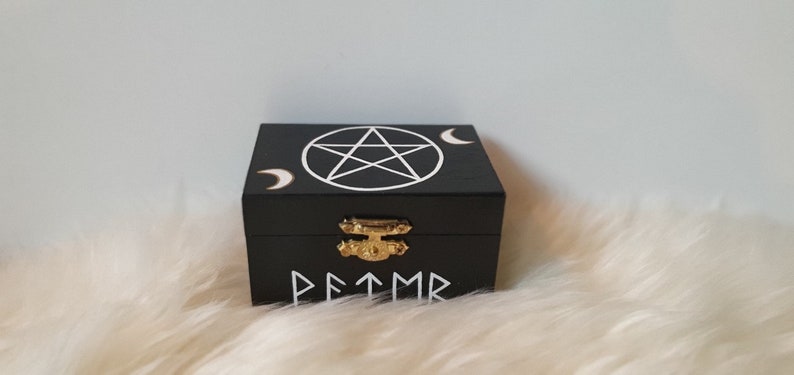
**Image property of prospective owner. See link above**

I've also loved the idea of printers boxes, but I'd be damned if I could find any in my area, so I decided to create my own little trinket storage for display in my new little cottage when I get my bookcases (and close when I have less than understanding visitors).

Here's how you can make your own Trinket Shelf. You will need:

-Hinged unfinished wooden box

-Paint in a desired color

-Popsicle sticks

-Thin dowel rods or bamboo skewers

-Decorative embellishments

-Mod Podge

-Hot glue gun and glue

*Note, all of these items I bought at the dollar store.

If you're not looking to close your shelf, then you don't really need a hinged box, but I wanted a hinged box, so that's what I got, lol. I then painted the entire box black (except for the inside). I then painted the inside a nice purple (DecoArt in Lavender). 


I allowed it to dry, then added some silver embellishments I got on a roll from the dollar store to the outside front of the box (they had a wide variety to choose from, I decided on this one).


I will note, I made a boo-boo. I should have gone over the box in Mod Podge before adding the silver embellishment, but I'll deal with that when I DO get some Mod Podge (the past couple of months have been a disaster on my bank account).

I then used some rather large popsicle sticks (think tongue depressors at the doctors office lol). I did a rough measure of how wide I'd need them to be, then roughly cut them with a pair of scissors. For each shelf in the box I used 3 sticks. I then used another large popsicle stick, and doing another rough measurement, I cut them into smaller pieces to hold them together. 


Taking the dowel/bamboo sticks, again, I rough measured the length I'd need, scored the sticks and snapped them off making a cleaner cut than if I were to try to actually cut them with scissors or just the craft knife. Measuring the inside of the box with a ruler, I determined I wanted my shelves to be roughly 6.5 cm from both the top and bottom of the box. I then hot glued the sticks to the sides of the box, then rested the popsicle stick shelves on the sticks. 


And there you have it. A simple display shelf for your trinkets. 


I plan on adding a Goddess image to the inside of the door, and some other embellishments to the outside, between the "chain".

My local dollar store also has hinged boxes with windows to display your items without them getting overly dusty or overly handled. You can do the same as above with these boxes, just be careful not to paint the glass as you paint the door. 

What you can add to this box now is totally up to your imagination. 


Monday, October 5, 2020

Runes

 Probably one of the most common tools handmade by pagans would have to be a set of runes. They're much easier to make than, say Tarot cards, and the materials you can use is almost endless. 

The dollar store nearest to me had packages of small, round wooden disks in various sizes, so I bought a pack (see previous post to see what else I did with them). 

I took the smallest round disks out of the pack and drew on my own runes. Because they're all one, uniform size, it will be easier to grab a random rune should one want to do a single rune reading for themselves. 


The packaging is only temporary. I plan on holding them in a black cloth bag.

With this said, there are absolutely numerous ways one could create their own runes. In a previous post, I showed how to make them with glass gems typically used as filler in vases or on the bottom of fish tanks. In another post, I also showed how one could use clay (I moulded the clay in to rough oval shapes, then engraved the rune symbols in each one). One can use river rocks as well, so long as they are fairly uniform in shape. 


Sunday, October 4, 2020

Borrowed Design

I love the blog WitchyWords. She works hard in her spirituality as well as in her profession and isn't afraid to share her struggles with the rest of us, which can make one feel like they're not alone in daily struggles. Most people would just like to post all the positive things that happen throughout their day and leave the negative stuff behind. It's nice to know that someone else out there also struggles with things like their own spirituality. I can say with total honesty that I struggle with my own spirituality considering I live with someone who is less than understanding when it comes to alternative beliefs (if it sounds ridiculous, then it is).

Anyway, Marietta, in posts past, created a rune chain for her home. I'd always loved this idea, but, like in my other post, never had anything I could use to make such a thing. Again, I hate clay (looks amateurish to me, and the stuff I have stains my hands, workspace and tools). But I like to think that things will come to those who wait, and lo and behold, I found something at one of my favorite stores to buy craft supplies for both spirituality, and practicality: Dollarama lol.

I found small round wooden disks in various sizes,

so I got them with other ideas in mind for these. Using a standard gel pen, I copied the bind-runes from her example onto the disks, hot glued some string to the back, and am now waiting to put them up in my little "cottage".

I'm thinking of adding something to the end...like a pentacle charm or something. Not sure yet, as inspiration hasn't struck on that one yet.

If you would like to make your own bind-rune chain like hers, or with your own bind-runes, the instructions can be found in the link above.


Saturday, October 3, 2020

Moon Phase Decor

 As stated in my previous post, I now have a little space to call my own.

But it's a little lacking in decoration, so I decided to make myself something to dress up the bare walls in this cute little shed. Mind you, I do have some furniture in here (a futon and a wire shelf I'm going to upgrade to a real shelf sometime this month), but the walls need something too.

I'd been wanting to create a moon phase wall-hanging for a while, but was never able to find anything to use. I don't like working with clay and cutting cardboard or foam board in a perfect circle is never easy. But luck smiled on me one day and I found some black circular chipboard at Michaels. Well, if I didn't scoop them up immediately knowing exactly what I had in mind for them.

For your own Moon Phase Decor, you will need:

-Circular item (I used black chalkboard circles from Michaels, but any item will do)

-Black paint (if your circle is not already black)

-Silver pen (Pilot Super Color in Silver is what I used), or silver paint

-Pencil

-String or cord (optional)

-Hot glue

Take your circle and paint it black if it is not already. Mine was already black, so I skipped this part.

I then used one circle to form the waxing and waning phases on the black circles, using a pencil (it's easier to correct a mistake with a pencil now than have to start all over again later).

Once I was happy with how the phases looked, I took my silver pen and outlined the pencil lines, and colored in the spaces. It took me a bit because my pen decided to crap out on me, so I had to go and get a couple more (I generally like to be prepared with extra...I thought I had an extra silver pen somewhere, but I guess I was wrong). If you don't have a silver pen, you can always do this with silver paint.

If you've painted, wait till the paint dries. Now you can decide how you want to hang it. I plan on making a wall hanging in which it sits on my wall in a vertical manner. If you want something similar, take your string or cord and measure it out roughly how long you want it to be. Finding the vertical center of your circles, add a line of hot glue down the back and affix it your string to it. Let it cool. Add a loop to the top of your "chain" and hang it where you will, and you're done :) :)

Alternative Uses

If you're not planning on hanging it with string, you can always attach them to a long piece of cardboard or other sturdy item and add it to your decor collection, either on a shelf, window sill or altar.

In all honesty, they're not as shiny as I hoped they would be, but I love them. In the picture above, I have yet to hang them, but once they are, I will update.

Good luck with your own adventure in making one, and I hope you love them as much as I love mine.